We asked the amazing Michael Holland for some really easy ways to start gardening with the kids while still making the whole experience fun.
It has never been a better time to get creative with plants, and it’s not just for those with a garden – you can still get clever with recycling and use a window or balcony.
Here’s two of my easy, creative and inexpensive “edutainment” ideas for the kids…and you parents might just enjoy them too!
Gardening with the kids: Grow your own ‘Shelf Life’ collection
I developed this at the Chelsea Physic Garden in London. ‘Shelf Life’ is a collection of plants growing in the corresponding packaging of foods, drinks, cosmetics and medicines (such as an orange plant in a carton of orange juice, or a tomato plant in a ketchup bottle) and is a reminder of our reliance upon nature and prompts you to ask the question: “How many plants have I used today?”
‘Shelf Life’ encourages recycling and reuse, so try to collect seeds from the food you eat and save relevant packaging that would otherwise be thrown away, keeping the labels on so it is still obvious what the plant is. Fill the packaging with soil or potting compost and plant the seeds (or rhizomes) inside.
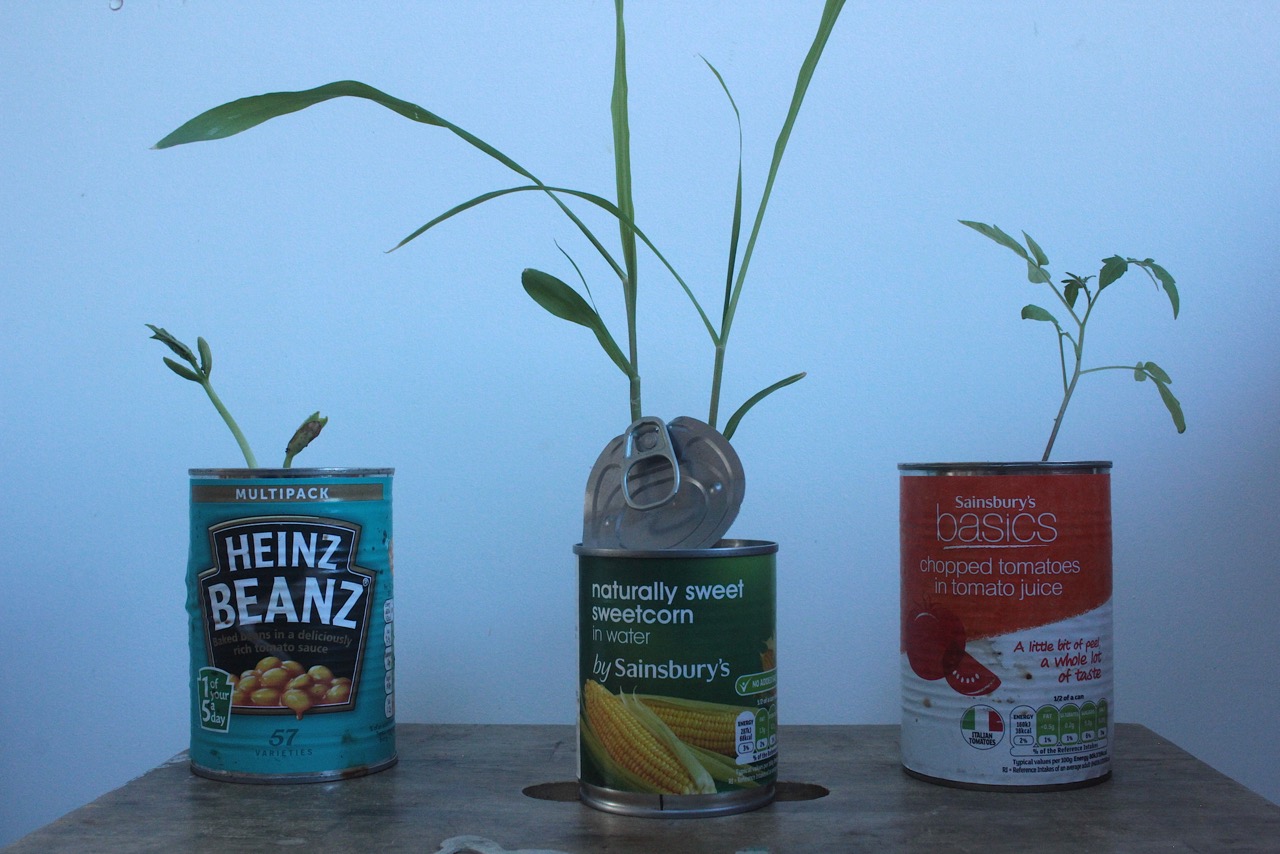
*Tip: Drainage is important! Fill the bottom of any packaging that you are using with gravel or tiny stones. This will also help weigh the containers down and stop them from toppling over.
Some seeds may grow more successfully than others, but read on for growing tips for ones you might like to try: Some reasonably easy to find and grow plants include:
- Apples & Pears – seeds can be taken from the fruit, but in order to ‘fool’ the seed into thinking it is springtime you have to put the seeds into the fridge for a few weeks before sowing them (this is called moist stratification).
- Citrus Fruits – three-quarters fill a (marmalade) jar with moist compost. Place seeds of lemons, oranges, satsumas, grapefruit or clementines on the surface of the compost. Cover with plastic film and stand in a warm place. After a few weeks, shoots should appear. Don’t be put off if the seed coats go mouldy – just make some holes in the cling film to let excess moisture out.
- Ginger – fresh root ginger grows easily indoors in the warmth. Half bury rhizome in sandy compost and keep watered. Why not try in an old packet of ginger nut biscuits?
- Peanuts will grow, as long as they are not roasted – they do require a period of warmth, and the peanuts are produced under the soil.
- Potatoes – put into a crisp packet some grit or small stones then some compost until it’s ⅓ full then pop in a smallish spud (or even some potato peel) and then fill to almost the top with soil above. Keep the soil moist and see what happens!
Gardening with the kids: Make your own newspaper plant pots
This idea is great for the planet as it reuses something that would otherwise end up in the bin (albeit the recycling bin). You will need: One sheet of newspaper per pot (tabloid or broadsheet size), an empty small glass jar and some masking tape (optional).
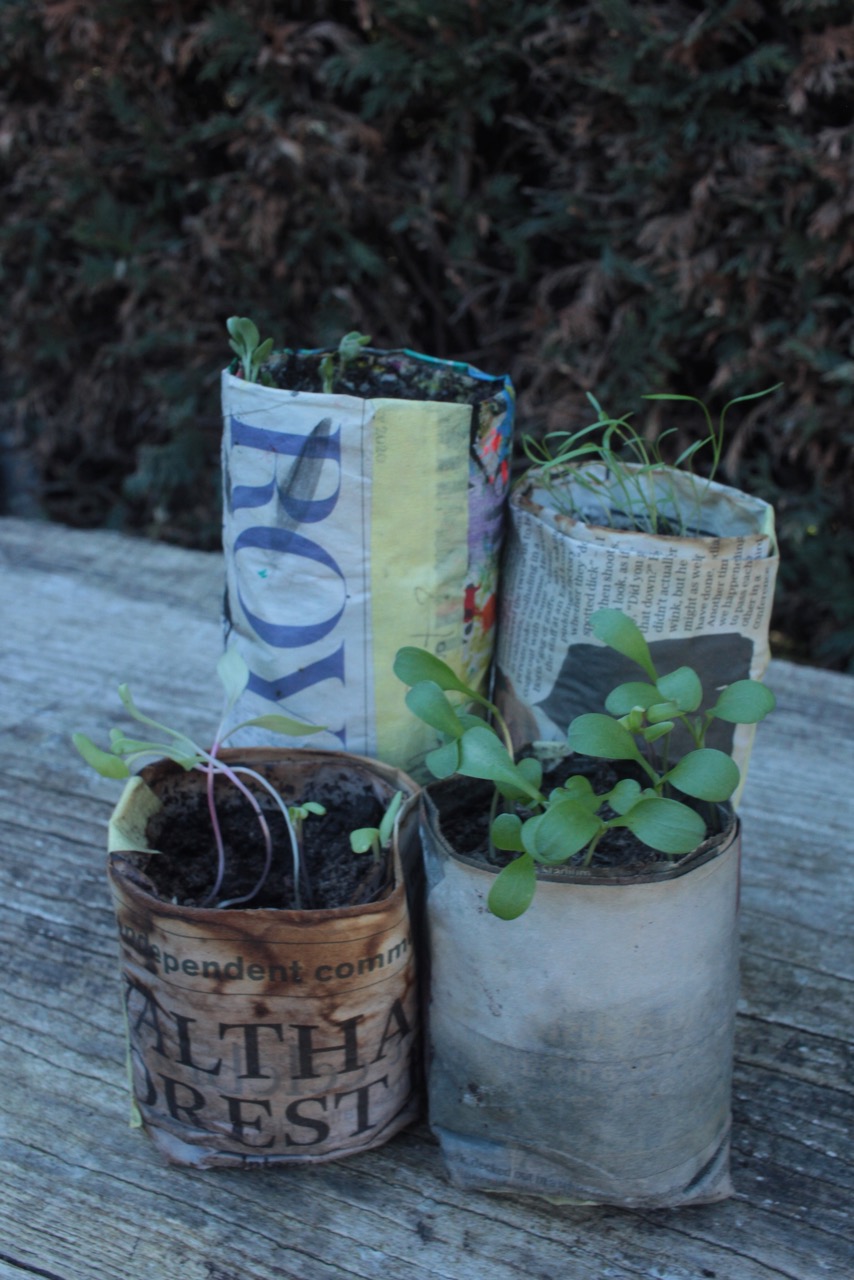
How to make them
- Lay your sheet of newspaper flat on a table in front of you, fold in half lengthwise (once for tabloid and twice for a broadsheet) to form a long, narrow strip.
- Lay a small, glass jar on its side and place it on one end of the strip of paper. Roll the newspaper around the jar. The jar is used only as a form to roll the paper around. About half of the strip of paper should overlap the open end of the glass.
- Push the ends of the paper into the open end of the jar. This step doesn’t have to be neat and tidy, just stuff the overlapping newspaper into the jar.
- Pull the jar out of the newspaper.
- Push the bottom of the jar into the newspaper cup, squashing the folded bottom to flatten it (in your hand). This will seal the bottom of your pot. Once the pot has been filled with soil, the bottom will be secure.
- To secure the pot further, you may want to stick a piece of masking tape from the base, up the seam and just over the rim of the pot. This is also a good surface to write the name of the seed you have planted and the date.
- Take the jar out and you have a finished paper pot, ready for compost and seeds to be added. These pots will dry out more readily than a plastic pot, so make sure the compost is always just slightly damp.

Michael was Head of Education at Chelsea Physic Garden for 25 years and has taught tens of thousands of people aged 3-103 about plants, nature and the garden in his career. He has spent his life getting children excited about plants and the natural world – and has put it all into his new book, “I Ate Sunshine for Breakfast”. It’s packed full of fun facts, hints, tips and exercises and celebrates plants in all their glory.

